Pages

Sunday, July 26, 2015

journeying by bus. (I don't know how many days its been...)

There have been many a bus adventure over the past month that I've tried to document a bit but I didn't try so hard as to get the adventures on the blog until now. My last post was about the big push to get the bus ready for the road and I promised I would soon show more pictures of the insulation. Well I lied. I don't have any more pictures of the insulation yet, but I've got some other pictures!

As far as the insulation went, we got insulation in the sides and the center portion of the roof. It ended up just being taped/held in with little wood strips. It was a very loud drive with it only in this way but it was better than nothing and all we had time for. 
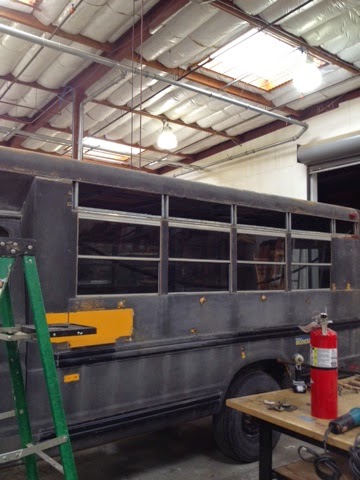
Bus on the road!


After getting that all done we packed the last of our belongings, including a futon and three bikes, into the bus and took off for Oregon! Our goal was to drive to Ashland on the first day which would be 6 hours. Between a few miscellaneous stops and leaving really late we made it almost to the California/Oregon border at around midnight and with no solid landing spot in Ashland we decided to just crash at the rest stop about 30 min south of Ashland. It was actually not horrible sleeping in the rest stop. Downside was we couldn't open the futon because we didn't feel safe putting the bikes outside the bus and there wasn't room with out taking them out. Plus side is we had easily accessible bathrooms and it was completely legal for us to sleep there unlike the streets of Ashland. 
It was really hot an noisy inside the bus and I was grumpy.


The next morning we hopped on the road bright and early (one does not sleep in much in a rest stop) and had a bit of breakfast in Ashland followed by a quick little tour for Will. We were back on the road by 10 and on our way to Corvallis. The last four hours of the drive were uneventful and we were happy to get to Corvallis and crash for a bit. We had the rest of the day to laze before we started work on our next big project.


The next big project.

We spent two weeks at the Oregon Country Fair building this set at Stage Left. Afterwards we took a few days off to re group including taking a trip to Portland where we are hoping to move in a few months. Thursday we got back on the road, this time actually stopping in Ashland for the night. Friday we left nice and early and headed for Berkeley. The drive was again gross and hot and tiring. I drank a lot of soda. 

We made it to the beginning of the bay, were very excited to be almost back when surprise! The bus died. No funny noises. No running rough. It just died. Tried to start it mid freeway, no luck. We pulled it off to the shoulder and scrambled to find the hazard lights. We tried letting it cool down to see if we could get it to start again to atleast get off the freeway, no luck. At this point we used Will's AAA to call a tow. I was sure to annoyingly insist over Will's shoulder that he tell them it was a bus. Be sure they knew it wasn't a standard size vehicle. We thought we were clear but the first tow truck showed up and laughed at us. An hour later the second tow truck showed up and took us to the only open aaa approved shop, pep boys. They also laughed at us when the bus showed up and said they couldn't work on it, but that we could leave it in their parking lot while we figured out what we were doing. 

We checked all the fluids, a few were almost empty so we filled them up, still no go. At this point we were hot and tired and needed to get home to the dogs we were sitting for the weekend. We called in a favor and a friend picked us up and took us back to Berkeley. 

In the morning I started frantically calling tow companies and mechanics seeing what I could do next. I tried to find a mechanic that would take the bus in Vallejo and everyone I called said it was too big. Next I tried to get it towed to Berkeley so I could try to fix it myself, but that tow would be $300. I tried to get AAA and they were grumpy at me. Finally I found a tow company who wouldn't tow it to Berkeley but were very helpful finding a mechanic that would take it. We drove back to Vallejo and had it towed to the new mechanic. 
Turns out it was the fuel pump that died. It took a week for the repairs to get done but my bus is now all happy and running and I'll be picking it up tomorrow!

-Merr. 

Wednesday, June 24, 2015

Days 23 and 24 - sheet metal and insulation

This weekend was my last big push before the bus goes up to oregon for a few weeks. I needed to get all the sheet metal closed up, the insulation in and the seat installed so it would be able to make the trip.


Saturday I worked on the sheet metal- found around with more bolts and rivets getting little bits I missed and closing seams I'd never dealt with. Everything came out pretty well except for these two weird corners at the front where stuff didn't meet up well. I made two custom corner covers to close up the bulk of it. There is still a bit of hole though that I'm just going to put a little temporary patch on for now. At the end of the day I did the first road test and drove the bus a few miles to Home Depot to get the insulation. I also stopped to fill up with diesal and discovered that my fuel wasn't siphoned after all. I think it was just the battery being dead that was stopping the bus from running before. (I bought a liking fuel cap anyways.) 


Sunday I had a bit of a delay because there were events going on at my work and I couldn't bring the bus into the loading dock to work on. I did some prep work while I waited and was later able to bring the bus in. I set up a table for cutting my foam outside the bus and cut out a bunch of sections of the insulation. The sides are now all insulated but I still need to go round and gaff tape the pieces in. Eventually the insulation will be covered with plywood but for now I'm just going to tape it in. 

I'm being lazy with pictures, but I wanteto get  the post out there. Next post will have lots of insulation pics! 

Thursday, June 18, 2015

days 19-22 ish? - seat!

Sorry for the lack of bus posts. I've been in a grumpy mood in regards to the bus because lots of things weren't going smoothly and I felt like I wasn't getting anything done when I worked on it. I probably had a few days of puttering with the sheet metal, trying to plug holes in the past two weeks. We will call those 19 and 20, though I'm sure there was more. 

Beyond puttering with the sheet metal I did accomplish something excellent which was building the passenger seat! I had been planning to buy a bucket seat for the passenger but I was getting frustrated by Craigslist, because I'd have to go get it, the seats available weren't that cute and they were more expensive than I wanted ($100ish). I also was planni to buy a new seat belt because most used seats don't come with full seatbelt setup plus it seemed safest to buy a new one. The seatbelt was $60. I got an orange one!

Back to the seat, I did a bit of internet (skoolie forums mostly) on rv seats and realized a lot of rv people add seatbelts to their existing bench seating for extra safety. Most times legally only the driver and passenger have to have a belt but some folks prefer to add a belt for other people in the rv. This got me thinking why not just add a belt to a chair? I also was assembling an ikea chair during work and  realized how it's simple, blocky design would be great for the bus! The chair was like $300 on ikea and a bit bigger than I wanted, but it was so simply built I figured I should just make one custom to my needs. Those needs included a storage box in the seat, a small profile and the ability to have it face forward for driving and backwards for tabling. 


Here is my design. It breaks into three parts- storage box, seat and back. 


I built the wood structure in one day with scrap wood from work. I was able to upholster it in two days with a bit of time after work, during breaks and a few hours my boss was nice enough to let me work on it during work. For this project I bought the foam new but everything else (including the awesome orange velvet) was stuff from work I was able to salvage or given. A Craigslist seat probably would have been $100 and still needed to be re upholstered, so I think this was a grand success. 

Friday, May 29, 2015

Days 14, 15, 16, 17 and 18 (oh my!)

Its been a long bus week. I'm going to be lazy and chronicle the whole week in one post.


Sunday the silent partner and I went in and started by removing more of the sheet metal so we could access the rest of the framing in order to cut it. We hoped to just remove the two sides but the framing at the front was being difficult as well so we removed that too. The other places we just drilled out the rivets along the bottom so the original sheet metal could just move up with the raise.


With the sides removed.

The back.

I debated keeping the sheet metal I removed (and I've still got it in the back of the bus) but decided not to use it for the sides. I had bought two rolls of 1' sheet metal for the raise but decided to exchange one of the rolls for 20" metal so I wouldn't have to re attach the metal from the sides. 

The first day of cutting the framing I was using a hand held grinder. On the second day we tried out a few different saws including a portable band saw and a sawzall. I was reluctant to try these two saws at first. Since I was having trouble getting all the way into the cut with the grinder I doubted we'd be able to get the portable band saw in. Once the extra sheet metal was removed it was quite possible though. For the sawzall I was worried the force would just rip through the steel and leave it all torn up. It ended up being a good solution for the awkward framing that we couldn't get to with any other saw and it didn't make the metal too torn up. It was also the fastest of all the cutting options.  

The other fun adventure in cutting came when I found two big steel plates in the front framing of the bus. I used a plasma arc cutter to cut across the plate and then the silent partner got the last bit of framing with the sawzall. 

Plasma!

Next, we lifted!

Actually, we went around the bus to a few places and lifted up on the roof. There were a few missed rivets or bits of framing we hadn't cut so we had to find them by lifting the roof as far as it would go. We may have bent a few parts of the framing. Oops. 

No more roof!
We brought if off to the side so we could get it level and squared to the bus low to the ground and not be pushing around a giant piece of steel over our heads. 

Once the roof was ready we put it back into place and welded the corners one at a time to make sure it was all squared. After that we went to town welding the rest of the uprights!


The roof has been raised!

Monday was a holiday so I left the bus in the shop Sunday night. After that success I decided to enjoy my weekend a bit and went to the city with a friend for the day Monday, planning to come back to the bus Monday late afternoon to put up the sheet metal. Little did I know how much of a pain in the ass sheet metal is. I worked from around 5pm to 10:30 pm and only got two pieces of sheet metal partially on, pretty sloppily I might add. My two biggest problems were that the sheet metal was very heavy and floppy so it was hard to get into position by myself and also that the rivets I bought to attach the sheet metal were not the right size. I ended up using machine bolts which was a fine solution. At the end of the night I grumpily put up some plastic sheeting over the front and back holes and asked the silent partner to move the bus back onto the street on Tuesday morning. I'd already set off the building alarm once for being so late so I didn't want to mess with getting the bus outside that night and the silent partner gets to work earlier than I do so he could move it out before the shop began work.

After not getting all the sheet metal on Monday I was quite grumpy and was determined to get the rest up on Tuesday after work. Of course I ended up working at the theater that day (not near where the bus is parked at the shop) and was exhausted from moving furniture all day so I called it quits after work. Wednesday I did end up working at the shop for the second half of the day and I finished my work early so I got a few hours of work in on the bus prepping the sheet metal for the other parts that I'd left open.

The following day I took a trip to Home Depot to get some more 20" sheet metal for the front. I had seen on their website that they have 10' long rolls as well as the 25' rolls I bought. I thought this would be perfect since I only needed about 7' for the front of the bus and the rest could be 1' sheet metal. Of course the 10' rolls are only sold in select locations and neither of my two closest Home Depots sell it. I really didn't want to buy another $50 roll of sheet metal that I was going to use less than half of, so I decided I would figure out how to fill the front another way.

While I was there I took a peek at paint. My research has told me that most bus people use Rust-oleum oil based enamel. I was hoping to find a different paint that was not oil based because cleanup would be a pain and also because Rust-oleum gallon sized containers of enamel only come in like 5 colors. I looked into the water based enamel paint we use here at the shop and decided it would be great because I could get it mixed to the color I wanted except it only comes in pints and is very expensive. Back to Home Depot- they did have the gallons of Rust-oleum for about $40 a gallon so I picked up two gallons of white and some acetone to thin it for spraying.


I took a peek at their Rust-oleum spray paint and they have so many pretty colors! In the enamel they had the teal color that was my second option of what to paint the bottom half of the bus. In the normal (non enamel) Rust-oleum spray paint they had the salmon color I've been wanting. I asked the guy in the paint department if he thought the normal Rust-oleum spray paint would work and he didn't think so. I stuck with the white figuring I could always paint it all white for now and figure out the color later (maybe after Burning Man). When I got back to the shop I chatted with our Paint Charge who thought the regular spray paint would probably be fine, so I think I'll go back and get it soon.


Later that day I pulled the bus into the shop but I didn't do any work because the silent partner and I had to go off to look into a studio we are going to stay in while we come back to Berkeley in the summer to do one more show. Side story time! - We are going to be building a chicken coop this weekend in exchange for one month of rent. The studio is ridiculously tiny which will be a fun challenge.

Shop bus!

Friday I got to work on the bus all day! It was delightful. I cleaned up the sheet metal I'd put up on Monday. I had to go around and square it up a bit better and put in the rest of the bolts. It took all day to get the two pieces I'd done on Monday to look nice, but they are up there very well now. I also put up one of the small pieces on the sides and put the front panel back on (with some modifications).

Prettier, re attached sheet metal.

Other side.

I used clamps to make sure it didn't come out wiggly. 

I used a metal ruler and a hammer to make a nice clean edge on one of the pieces of sheet metal. I think I will try to do this whenever there are two pieces overlapping so they look clean. I'll try to get a picture of my bending setup next time.


This little piece has my nice clean bend on the left side.

For the front panel I decided to cut in half the original panel and then fill the middle with two overlapping pieces of the 1' sheet metal. By putting two pieces together I will also be able to cover the round holes on the original pieces where the lights were. To cut the original piece I just drew a line across and used a cutting wheel to slice it. The original sheet metal is thicker than the new metal so I couldn't use metal snips for it. I'll be covering up the part I cut on the original sheet metal so I didn't care about it looking messy. I went ahead and reattached the two halves but did not get to putting the new metal up in the center.


And that is about it for this week in bus land! I probably won't be working on it this weekend since we're building a chicken coop, but if I can I'd like to put up a little more sheet metal so I feel more safe about putting it back on the street.


Mer.


Saturday, May 23, 2015

Days 12 and 13 - bondo and razor blades

Surprise surprise, the roof isn't raised yet. But tomorrow! Hopefully!

Friday (day 12) the prop shop decided to quit early and so I got a few hours of bus work in. I went ahead and pulled the bus into the shop since the scene shop wasn't working Friday or on the weekend. 

 I went around with a wire wheel and cleaned off the dirt and paint around some of the holes in the bus's body in preparation to fill them with bondo. I also gave them a wack with a ball peen hammer so the holes would be slightly indented and easier to fill.  


My other task was scraping off all the lettering and reflective sticker stuff that is on the front and back of the bus. I hadn't realized it was all still there because it had been painted over. I switched back and forth between a paint scraper and a grinder to get it off. The grinder is dusty an makes your hands feel numb but the scraper is tedious and breaks a lot (I probably snapped 5 or 6 razor blades.) 


The next day (Saturday) I continued cleaning up the body. I also ventured into removing note rivets and got one side of the bus open so it will be easier to it off the roof tomorrow. I also filled some of the holes in the body with bondo. 


The biggest news came later when id finished for the day. The silent partner came home and told me he'd seen a refridgerator on the side of the road that was just the right size! We hurried out in his truck and snagged it. It was dark out so no pictures yet, but it's pretty much just the size I was looking for! Tomorrow I'll plug it in and clean it up. I hope it works. :p


Sunday, May 17, 2015

day 11 - almost roof raise.


Today was a much more productive bus day, but unfortunately the roof still remains unraised.

The silent partner and I (we lost our companion) arrived at the shop around 1:30. First thing we plugged the batteries into the charger so we could give them a few hours good charging.

Next we jumped into taking off the rest of the ceiling. I'd drilled out most of the rivets last time, but the ladder was bolted through the ceiling and I needed a second set of hands to get it off, hence waiting until today when I had the silent partner. We made quick work of the ladder and the ceiling and then suited up to deal with the insulation- gloves, respirators, long sleeve shirts, goggles. Dealing with the insulation in all these things got horribly warm and we took a few lemonade breaks in the process.


No more ladder.


After the insulation was out we cleaned out the rest of the bus- putting the scrap wood, spare tire and pieces of metal I am saving out in the shop so they wouldn't be in our way. We gave it a good sweep and blow out with air as well.


Getting a good clean.

Look at that empty bus.

The silent partner and I split up between the two big tasks of getting the roof off- cutting the steel framing and drilling out the rivets. I stayed inside the bus with a grinder cutting the framing. The first side I cut was really easy, there was only one side welded on each framing piece so it was just one cut. The other side however made me very grumpy because it was welded on four sides in very hard to reach places. I cut away at them for quite some time and was still unable to cut all the welds. On the outside of the bus the silent partner was able to get all the rivets out and we did some brainstorming on what to do at the front and back of the bus where there isn't a nice clean seam to put the 1' extension at.


Drilling out rivets.

No more rivets!

A mostly cut off framing member.

The silent partner had the good sense to get a fire extinguisher ready.

After getting that all sorted we turned our brainstorming to how to deal with the framing I was not able to cut. The conclusion we came to is we needed to remove the sheet metal that was directly outside the place I was cutting the framing all the way. Luckily there is this smaller panel along the sides that looks like it shouldn't be too hard to remove. Then cutting the framing will be much simpler. When it comes to putting the sheet metal back on I have two options I'm going to consider. First I could stick to the plan and put the original sheet metal back on and then add the 1' sheet metal flashing I bought. Alternatively when I bought the flashing I also saw some rolls that were wider than 1'. I don't remember how big they were, but if it happens they are the same or bigger than the gap I'll have after I remove the old sheet metal and do the raise I may just return my 1' sheet metal and get that instead. It will cost a bit more but look much prettier than the patched together sheet metal.

The panel with the yellow is what I'll remove.

Removing this other piece of sheet metal would mean drilling out rivets for a few more hours and since the bus was still in one piece with no huge holes in it we decided to call it a day. Next weekend is a 3 day weekend for me and a 4 day weekend for the silent partner so we will get the rest done then.

While I'm disappointed we didn't get the raise done we did quite a bit of good work and came up with a new plan on how best to approach it next time, so I'm pretty satisfied.  

day 10 - raise attempt number one.

Today was meant to be roof raise day, but the world had other plans.

Hindrance #1
The night before was the opening night of the last play of the season at the theater where my roof raising assistants and I work, so there was a good bit of staying out late and drinking too much. Saturday morning started well after noon and with a lengthy breakfast. By the time we got to the bus it was quite a bit later in the day than I'd hoped.


Hindrance #2
The bus had no fuel in it! As I believe I've mentioned before, the fuel gauge in the bus is broken. I've got a little notebook on the dash where I can calculate my miles and gallons and figure approximately how much fuel I've got. I hadn't done any calculations since we'd gotten the bus to Berkeley, but I have driven it next to nothing since it got here and we filled it up close enough to Berkeley in our drive down that we figured it should have at least a half a tank left when we got there. I still need to check my calculations in case I was just wildly off, but the current theory is that someone siphoned out the fuel. I'd left the bus parked in one place for close to two weeks and someone probably pegged it as an abandoned vehicle. A locking fuel cap has moved higher up on my priority list. Luckily we found a fuel can at work (It may have been a prop fuel can, not one that was at the shop with the intention of being used for fuel...) and the silent partner ran to the gas station for some diesel. There was some fun troubleshooting with getting the fuel into the bus, as the can did not have a spout.


Hindrance #3
The battery died. After all that trouble (and money) of getting the alternator to work, the battery died. Maybe there was a light on somewhere I missed. First we tried to jump it with the silent partner's truck. Not enough power (the bus is fun and has two batteries so its super powerful.) After consulting the manual and the father the conclusion was I needed to buy a battery charger and just let the batteries sit and charge for a few hours. Luckily at that point someone else from the shop wandered through and told us that the shop does indeed have a battery charger. We strung an extension cord out to the curb and started the bus a-charging. It had to sit for around an hour before it would start, so we took a lunch break. Once the bus started we drove it into the shop.


Once the bus was at least in the shop we were pretty tired and didn't want to keep going. We did pull a bunch of scrap metal and trash out of the bus before we left. The shop recycles scrap metal (for beer money!) so we stuck all of my scrap pipe, sheet metal and bracing on dollies so it could be put aside for them.


Oof what a bus day. Now I know a good bit more about making a bus start!